By adding more white or yellow you can create pastels. Have a try at it yourself!
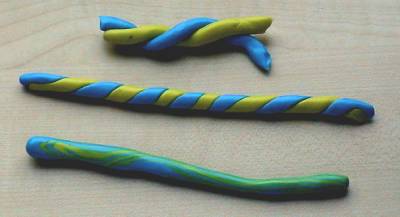
Candy cane effect
Twist two rolls of different colours; roll this short and carefully smooth.
Modelling
Its necessary to make the clay smooth
and loose by kneading so that all air disappears from the clay and the
clay will become smooth using your body heat (do not place the clay
on the heating or in the sun, since that will cause the clay to become
more granular).
Especially Fimo Classic stays granular.
For kids Fimo Soft or Creall-therm junior will be easier to use.
To make i.e. Fimo Classic easier
to use you can add MixQuick. This is "white" polymer clay, which does not
affect the colour of your work piece.
Its not recommended to knead all of one colour at once, knead the clay in two or more parts, it will be easier and quicker to mould. Make rolls of the clay and braid them, roll again and repeat this.
Mixing
You can use the above-mentioned theory
for mixing more than one colour, i.e.:
· red and yellow makes orange
· red and green makes brown
· blue and red makes purple
· black and white makes grey
You can of course mix all colours,
Fimo and Creall-therm alike. By using other quantities you will obtain
beautiful shades (see the colour chart).
Pastels
By adding more white or yellow you
can create pastels. Have a try at it yourself!
Candy cane
effect
Twist two rolls of different colours;
roll this short and carefully smooth.
Marmor effect
If you do not mix two or more colours
entirely you will get a beautiful marmor look. Do be careful with darker
colours they are extremely dominating.
Basic forms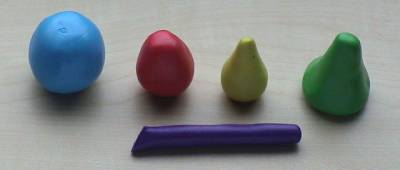
Have a try at the following first,
after which modelling will gradually become easier
a. Ball; roll the clay between your
hands and make a ball (several sizes)
b. Egg; roll a ball but put a little
more pressure on one side. Make it smooth.
c. Drop; make a sharper point at
the egg with thumb and index finger
d. Flat cone; flatten the drop at
one side on your desk or table
e. Roll; used many times for i.e.
arms, legs. More pressure (but also more time to roll) results in a thinner
roll.
f. Barrel; flatten both sides of
a roll (thick one).
Creasing and
Folding
You often use this method for clothing
(dresses, coats etc.). You need a thin roll of clay, which you flatten
in even layers. The thinner the more beautiful creases you get. Use a kitchen
knife or a sateprikker to lift a crease, put it layer over layer. Please
have a look at the pictures on the more experience-page.
Library
There are a lot of books to chose
from, otherwise try to buy one. First try some simple forms, like I mentioned
above. You will see that the more you practice the more fun you get out
of this marvellous hobby. After this you will be able to experiment yourself.
Good Luck!